After a week of searching the internet and countless errands to Koti to get all the electronics at the minimum of cost, we could finally make a non-sinking RC Catamaran! Now you can make it in less than two hours provided you have all the material needed. I will list down here to the exact detail as to what you will need and also the price they cost.


One Stop Shop:
To get the above mentioned electronics, head to Koti, The electronics lane after Women's College (if its your first time, you need to ask someone)
After taking a peek into every goddamn shop from morning till evening, we found these shops in order of preference to have all the stuff we needed and at the best price.
Roland Electronics
Kishore Electronics
Starting Off !
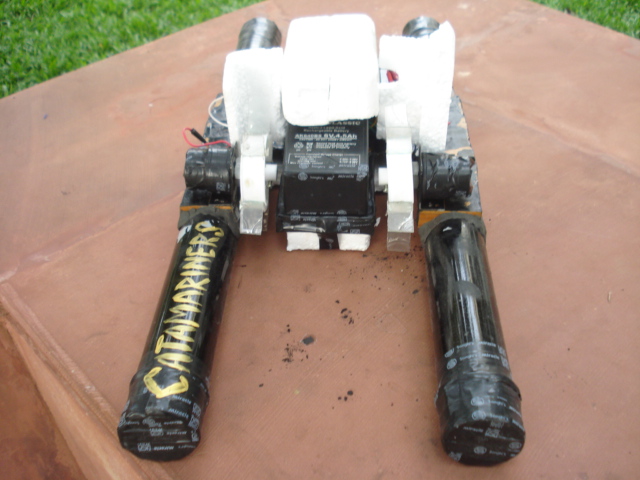
Before you start on, decide on the design. Ours was inspired by the catamaran because of its simplicity. All that we needed were two pipes and a wooden plank to hold them in between as shown in the picture. Be ready to bring yourself to the workshop to do the necessary cutting of pipes and wood.


Get all the stuff you need. Find a proper place to assemble things together. Also find yourself a pond where you can test your boat.
Step 1: Making the body
We got two pipes of size 60 cm long and a wooden plank of dimensions approximately 25cm X 20 cm. We made slits into the pipes so that the plank could snugly fit into the pipes. Later we had to use M Seal to fill the gaps in order to make the entire boat water proof.

Step 2: Making the propellers
After getting the body of the catamaran ready, it was now a challenge to make the propellers. We didn't want to use the ready made ones that we found in the market, rather we made our own with wheels and pieces of CD by inserting into the slits we made in the wheel. Look at the picture for more detail.
Step 3: The heart of it all, The Circuit.
We used the circuit to make our boat. Since we were dealing with a RF Controller for the first time, it took us some time to figure out the working of the poles inside it.

 |
| RF Module (Receiver) |
 |
| RF Transmitter |
Step 4: Putting it all together
Once you are done with all the above steps, its a piece of cake. All that remains is to assemble everything onto the wooden plank. It is necessary to place the the batteries at the center of gravity, otherwise the boat will sink. For that you need to test the boat in water and know it from trial and error rather than make actual calculations.
How does the end product look ?


Advantages of this design:
This design provided a lot of stability to the boat as opposed to other light weight boats.
Disadvantages of this design:
This boat is not suitable for taking steep curves as it is too big. So if you want to participate in a competition in which the arena has many twists and turns, you need to reconsider your design.
Improvements:
- You could use more powerful motors for the boat to move faster.
- You could place the propellers on the outer side which would enable the boat to take relatively sharper turns
- You could also use a rudder behind for better steering, but you need to reconsider the circuit in that case, as you have to also control the movement of the rudder.
These links help you understand better
This boat could serve as a ticket to you winning a competition or you could also make this a personalized gift for your younger brother. We had fun making this little boat. Hope you have too ! All the best..
Thanks to my team mate, Nithin Reddy Gaddam, Sai Teja (for his help) and Mr. Somasekaran Sir.
not bad
ReplyDeletei would have really appreciate that if instead of writing this whole method you could make a video on it. that will be nice to understand. overall thanks for sharing this nice information....search for more information
ReplyDelete